Home » Posts tagged 'concrete driveway'
Tag Archives: concrete driveway
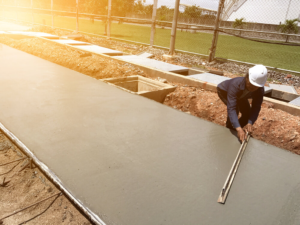
What Goes into Driveway Paving?
If you’re considering paving your residential driveway, be sure to work with a reputable contractor. A good contract will clearly specify utility protection, drainage and sub grade construction.

Cost and surface choice are important considerations when deciding whether to pave. Asphalt is more expensive upfront but may save you money down the road by not needing to be resealed like gravel driveways do. Contact Driveway Paving Charleston SC for professional help.
The sub-base of a paving system is an important step that helps to create a strong foundation for the new surface. This layer of unbound granular material is placed directly underneath the base course, and it offers additional support by distributing load across a larger area. It’s made from either granular aggregate, such as crushed stone or gravel, or recycled concrete aggregate (RCA), which is the perfect way to reduce your project’s carbon footprint while still offering exceptional strength and compaction.
Depending on what surface you’re trying to install, the sub-base can be as thick as 6 inches or as much as 30 inches. It’s constructed in layers, with each one compacted to the highest standard possible. To get a good result, it’s important to excavate and prepare the site correctly before starting. This involves clearing the area of any vegetation, removing roots and organic material, tamping the soil, and grading it to a level surface.
A reliable paver will always install a geo-textile fabric over the sub-grade prior to rebuilding the sub-base. This is an inexpensive step that makes a huge difference in your driveway’s longevity.
After laying the geo-textile fabric, your paver will build up the sub-base with 10 inches of 1″ minus stone, which is screened to only allow stones that are 1-inch in size to pass through. Runner-crush is similar to minus-4 stone, yet it’s crushed through a screen with slots that are slightly smaller. This gives the runner-crush a more finely chopped texture and allows for better compaction.
Once the sub-base is in place, your paver will perform a proof roll test to ensure that it binds securely with the base course. This is a crucial step that will help prevent future settlement and sliding. Your paver may also add a bit of binding material at this point to further enhance the strength of the sub-base. Then, they will grade and compact the sub-base layer to its final thickness.
Asphalt Binder
Asphalt contractors refer to two distinct layers of a pavement: the binder layer and the topcoat. The binder is the glue that binds aggregates together. It must be tough enough to support heavy traffic and withstand the effects of extreme weather for decades.
The type of binder used depends on the project. For instance, highways require a higher stiffness that can resist the forces of rutting and shoving. A thicker pavement also requires a binder that is more resistant to water damage. The asphalt paving contractor will consider these factors when choosing the right type of binder.
Traditional asphalt binders are sourced from fossil fuels and produce greenhouse gases during the production process. These environmental concerns motivate the construction industry to pursue more sustainable alternatives. The development of warm-mix asphalt and other innovative production methods allow for the use of recycled materials, reducing the need for new resources and diverting waste from landfills. Similarly, performance-graded asphalts offer eco-friendly solutions that prioritize functionality and long-term durability.
Like the sub-base, the choice of a binder depends on the engineering specifications for your pavement. Your paving contractor will assess your budget and project goals, and choose a suitable solution from a variety of options.
An asphalt binder is a mixture of oils, polymers, Gilsonite and other additives that improve its viscosity and workability. The addition of these components increases a binder’s ability to bond with aggregates and provide a strong foundation for a roadway.
Choosing the right type of asphalt binder requires an expert eye and thorough research. It’s vital to understand global market trends and the economic, technological and environmental forces influencing the industry. For example, the price of crude oil impacts the cost of refining and production. The resulting variations in supply and demand influence the final pricing for asphalt binders.
The demand for asphalt binders is also driven by the need for durable and economical infrastructure solutions. While some prefer to stick with a more conventional product, there is a growing demand for high-performance asphalt binders that deliver longevity and durability. Moreover, as the world becomes increasingly environmentally conscious, there is a move towards asphalt binders that minimize negative environmental impacts.
Load-Bearing Layer
A driveway is much more than just a place to park your car. It is a key access point to your home, an inviting welcome mat, and a major investment in the value of your property. It is important that it be able to support the demands of everyday use, weather conditions, and environmental stressors. To accomplish this, it requires a multilayer system that supports the structural integrity and function of your driveway.
The foundation of your paved driveway begins with clearing and excavating the area. This will typically involve removing existing dirt, debris, and plant material and then excavating to a depth that can accommodate the thickness of your base materials as well as the pavers you are choosing. It is vital that any underground utilities are properly located and flagged before digging starts to avoid any mishaps.
When excavated correctly, a quality soil sub-base can be constructed to provide stability for your entire driveway. The soil should be graded and compacted to ensure a consistent and level surface for the base layer to rest upon. A good choice of materials for your sub-base include crushed stone and road gravel, depending on the location and expected load. This layer is also referred to as the base course and it is an important component in maintaining the structural integrity of your driveway.
In addition to providing a smooth, durable surface for vehicles, this layer also helps to improve drainage and protects the subgrade from water seepage that can cause shifting. When choosing your sub-base material, consider how many cars you expect to park on the surface and ask your paving contractor about the appropriate thickness for your specific needs.
Once the base is in place, your paving team will apply asphalt and use small hand tools to spread, tamp, and roll the applied asphalt. This will give the pavement a smoother, more textured look and help to reduce any cracks or gaps that may occur during construction. Finally, edge restraints will be installed to keep the pavers in place and prevent them from moving, especially when wet.
Transitional Areas
A paved surface is a great way to improve the look of your driveway, and also protects vehicles from damage caused by mud and gravel. It also minimizes dust and dirt, and makes it easier to keep weeds out of cracks. In addition, it provides a safe and quiet ride for vehicles. However, before you install a new asphalt driveway, you should understand what goes into the process of paving your driveway, and the steps involved in creating a durable and long-lasting surface.
Before the asphalt layer is installed, the sub-grade must be prepared. This involves removing all rocks, debris and vegetation, and treating the soil with a soil sterilizing agent to inhibit future weed growth. The area should be graded and compacted to ensure proper drainage. A good draining system is essential to avoid water pooling and causing the sub-grade to weaken over time.
If the driveway is being built over a concrete garage pad, the soil must be properly slanted to allow for proper drainage away from the structure. This is important to prevent puddles or flooding that may impact the foundation and sub-grade of the garage slab and the surrounding asphalt.
Another step in the process is edging the driveway, which involves trimming the existing edges to create a clean and defined boundary. This is done before the overlay begins to ensure a smooth finish and enhance the appearance of the driveway.
Once the base and underlying support layers are in place, the asphalt layer is laid over them. This is made of a mix of small aggregate, sand and oil that is mixed together to form jet-black asphalt that is both beautiful and functional. A layer of rubber mats is sometimes placed on top of the asphalt to reduce noise and vibration.
The final step in the paving process is compaction. This is done with multiple passes of a roller to ensure that the asphalt is firmly packed, which adds strength and durability to the pavement.
If you are considering a paving contractor for your driveway, it is important to know that the process is complicated and requires experienced contractors. A poor quality job can lead to a failed surface that will only last a short period of time, and you could end up with a much more expensive repair bill. A reputable paving company will make sure that your driveway is constructed correctly the first time around and will provide you with a professional-looking, long-lasting surface.
The Benefits of Concrete Leveling
Concrete Leveling Dallas raises sunken concrete surfaces to their original position. It improves safety and functionality while enhancing appearance. This repair solution comes in various forms, and the optimal method depends on the situation and desired outcome.
Uneven surfaces are easy to identify and indicate that they need to be leveled. Early intervention is key, as leveling is cheaper than replacement.
The cost of concrete leveling can vary depending on various factors, such as the size of the slab to be lifted and the depth of the void underneath. Also, the cost of labor, fuel, and materials can affect the final price of a concrete leveling job. A professional company will give you a free inspection and estimate before starting the work. This ensures that you are getting the best value for your money.
If you are still determining the concrete leveling costs, you can consult with local specialists who offer a free inspection and quote without commitment. This way, you can be assured that the estimate is tailored to your unique needs.
If a sunken concrete slab has not been significantly damaged, leveling can be less expensive than replacing it. Moreover, leveling can be more efficient than digging up the old concrete and pouring a new one, which is disruptive and more expensive.
Leveling is an affordable repair solution that can restore your property’s integrity and appearance. It is ideal for driveways, sidewalks, patios, and pool decks. In addition to improving aesthetics, it can reduce safety hazards and improve your property’s value. It is important to regularly assess the condition of your concrete surfaces and take action as soon as you notice any signs of damage.
There are several different methods of concrete leveling, including mudjacking and polyurethane foam injection. Mudjacking uses a mixture of cement, water, soil, and sand to lift a sinking slab. The process is time-consuming and expensive, but it can provide a long-lasting result. Polyurethane foam injection, on the other hand, involves drilling holes into a sunken slab and injecting a liquid material that fills the voids under the concrete.
While DIY solutions may seem like a cheap alternative to professional concrete leveling, they can be dangerous and ineffective. If you want your concrete to last, contact a qualified contractor who offers a warranty on their services. They will also provide detailed estimates and a complete breakdown of the costs associated with each repair method.
Appearance
Concrete is one of the strongest and most durable construction materials on earth, but that doesn’t mean it’s invincible. It’s still prone to cracking and sinking over time, leading to uneven and unattractive surfaces. Concrete leveling can repair this damage and bring back a more attractive surface. It can also help prevent water damage to the surrounding soil and ensure proper drainage.
If you see signs of uneven or sinking concrete, contact your local experts at the first sign of problems to get a full evaluation and advice on the best repair methods. They can also tell you whether concrete leveling is a good choice for your specific situation. Depending on the severity of the damage, concrete leveling can be a cheaper alternative to replacing a damaged slab.
Uneven concrete can create tripping hazards and reduce the overall appearance of your home. In addition, it can be a safety risk for people and pets. It can also cause damage to vehicles as they try to negotiate lopsided garage or driveway slabs. Concrete leveling can fix this problem by raising and stabilizing the concrete. It’s usually faster and cheaper than resurfacing or replacing the concrete slab.
During the concrete leveling process, holes are drilled into the sunken areas of the affected concrete. A leveling compound is then pumped into these holes to fill the voids and raise the concrete slab to its original position. The hole can then be patched and covered to match the existing concrete surface.
A concrete leveling contractor can also use a more advanced method known as polyurethane foam injections to improve the longevity of the repaired slab. This procedure uses a similar process to traditional mudjacking, but it requires less drilling and produces a much more stable result.
The biggest issue with concrete leveling is that it can sometimes be a difficult and messy job. This is especially true in cases where there are physical obstacles like pipes or tree roots that can interfere with the concrete leveling process. However, an experienced concrete leveling company should be able to identify these issues and give you a fair estimate of the damage that will be caused during the repair process.
Safety
Concrete leveling raises sunken and uneven concrete surfaces to their original position, boosting safety, functionality, and curb appeal. The process is quick, affordable, and more environmentally-friendly than slab replacement. However, it is important to choose a professional concrete contractor and understand the potential complications that can occur during the repair.
Uneven, sinking concrete is a major safety concern for homeowners. It creates tripping hazards and can damage vehicles as tires struggle to maneuver over the surface. Uneven concrete also makes driveways, garage floors, and patios unsafe for pedestrians. It is important to catch and address concrete deterioration as soon as possible, as failing to do so can lead to severe damage and costly repairs down the road.
A qualified concrete leveling company will inspect the area and recommend a course of action. Depending on the cause of the problem, the technician may suggest surface leveling, stone slurry grout, mudjacking, or polyurethane foam injection. Before the repair begins, the technician should prepare the surface by removing any debris and cleaning it thoroughly. This will ensure that the leveling compound adheres properly and provides long-lasting results.
The cost of concrete leveling can vary widely, depending on the method used and the extent of the damage. Many professionals offer free inspections and estimates, allowing homeowners to make an informed decision about the best repair solution for their home. In general, concrete leveling is more economical than concrete replacement, especially when the damage is widespread.
While concrete leveling is an effective way to address safety concerns, it is not a permanent solution. It can take up to a week for the concrete to set, and it will eventually settle back down to its original position. Additionally, it can leave voids or cracks that require further repair.
While these problems are not common, they should be considered before choosing a concrete leveling service. To prevent these issues, it is essential to hire a certified professional with extensive experience. They will be able to spot hidden issues that can affect the final result and provide solutions. Moreover, they will use safe materials to avoid any potential injuries.
Environmental impact
Concrete leveling involves injecting a specialized solution beneath sunken concrete surfaces to raise them back up to their original position. It can be used to level driveways, patios, pool decks, and more. The technique is less invasive than traditional repair methods, including mudjacking, and offers superior results. While the process may leave minor damage behind, the result is a stable and sturdy surface that improves property value and safety.
Uneven or sinking concrete isn’t just unsightly – it can also pose serious safety hazards. If someone trips or falls on a damaged slab, you could be held liable. Concrete leveling eliminates trip hazards, preventing accidents and safeguarding your guests’ well-being.
A professional concrete leveling specialist will have a range of solutions that can address your needs and budget. Some will offer a free inspection and quote to ensure you get the right solution for your property. Others will have financing options so you can make quality repairs without breaking the bank. Whatever your need, a reputable professional will be transparent about the costs and benefits of each option.
In addition to addressing safety issues, a concrete leveling service can help you maximize the lifespan of your concrete and reduce maintenance costs. Regular inspections of your concrete will identify any signs of settling or damage, enabling you to take action before the problem gets worse. These steps may include directing water away from concrete surfaces, sealing cracks, and ensuring proper drainage systems.
Uneven and sinking concrete can detract from the aesthetics of your home, causing it to lose value. A top-tier concrete leveling professional can provide a cost-effective solution that preserves the beauty and function of your home’s exterior, ensuring it maintains or even increases its value.
There are several concrete leveling techniques, but all aim to lift and stabilize uneven or sunk slabs. The most popular is polyurethane foam injection, which uses high-density polyurethane to fill voids and lift sunken concrete. The injection process is quick, precise, and less disruptive than mudjacking, which can be time-consuming and expensive. The polyurethane foam cures within minutes, so you can get back to using your driveway or patio immediately.
How to Get Started Laying Bricks
Bricklaying is a skilled craft and requires proper planning, attention to detail, and patience. However, even the most novice can become proficient at laying bricks with practice.
Start by scooping up a sausage shape of mortar with your trowel and buttering it across one end. Press it onto the first guide brick. Visit https://www.bricklayerperthwa.com.au/ to learn more.

Brick laying is a skilled trade, and you’ll need a bit of experience to master the technique. But if you’re committed to the task, it’s possible for even a beginner to get started and develop their skills over time. A few simple tools, a willing attitude, and you’ll be on your way to creating strong and beautiful brickwork.
The first step in laying bricks is to prepare the work area and materials. You’ll need a suitable work space, a trowel, some mortar mix and the bricks themselves. It’s also important to have a spirit level and a string line with pins attached, as these will help keep your wall straight and aligned.
You should also prepare the mortar mix and dampen your bricks before you start. A good mortar mix will have about four parts sand to one part cement, and should be wet enough that it will form a thick paste when you use your trowel to apply it. It’s a good idea to buy a mix that already has a plasticiser added, as this will make it easier to use and prevent the mortar from becoming too watery.
Once you’re ready to start, set up your guideposts. These are long wooden boards or posts that you’ll place along your wall, and each will mark the height of a row of bricks, also known as a course. Clamp a string between two of your guideposts, then run it to the end of your work area so that you know how high to lay your first course of bricks.
After laying the first course, you’ll need to cut the rest of your bricks so that they fit with each other. To do this, you’ll need a lump hammer and a chisel. To cut a brick, lay it flat on a solid surface and mark it with your hammer where you want to cut it. Then, carefully chisel away the excess brick, and secure it with mortar.
As you build up each course of your brick wall, maintain a keen eye for uniform mortar joints, using a jointer to shape and smooth them. Consistency in joint width and bond pattern, whether it’s stretcher or English bond, will improve the quality of your brickwork.
Bricklaying is a skilled trade that takes time to perfect, and if you want to ensure that the brickwork you build will stand the test of time, then it’s worth taking the time to do the job properly. With the right tools, technique, and guidance, anyone can learn how to lay bricks and create a stunning addition to their home or landscaping project.
To start with, it’s important to prepare the area where you are going to be laying your bricks. This includes preparing the site, bringing all the bricks into relatively close proximity, and cleaning away any loose debris or rubble. It is also a good idea to dampen the bricks down before laying them; this will help them set more quickly.
Once the site is prepared, a bed of mortar should be laid on the base where your wall will be built. Then, use your gauging rods to mark out a guideline for the first row of bricks. Make sure that the line is straight and level and that it sits correctly against the gauging rods.
It is a good idea to use a ‘jointer’ when the mortar has set to smooth out the joints. This can be something as simple as a piece of copper pipe that has been bent into an ‘S’ shape and will give the finished joint a nice smooth surface.
When you are ready to lay the first brick, place it in the bed of mortar, making sure that it is flush with the ground and against the gauging rods. Press the brick down slightly, and check that it is straight with your spirit level and string guideline.
After the first brick is laid, use your trowel to spread a small amount of mortar over it and feather it away from the edges of the brick. This will make the wall stronger and prevent water leaking into and damaging the structure.
When you are constructing a wall with more than one course, stagger the bricks with each new row. This will ensure that the seams are spaced out and will make the wall more attractive. This will also improve the acoustic and thermal performance of the wall.
Once the foundation bricks have set, you can start laying the rest of your wall. First, make sure the area is clean and ready to work. If the surface is curved or uneven, you may need to install a support structure or level it with the ground before continuing. Then, prepare your mortar. Heap five parts sand to one part cement on an old board and mix with a shovel, adding water until you have a consistent texture. You should also have a small amount of water on hand to keep the mortar moist while you work.
Once your mortar is prepared, lay your first row of bricks. Use the guideline and level to ensure everything is even and at the right height. Continue this process, placing a brick every 1/2″, until the bottom row is completed. When you reach the end of your guide line, move it up to the next marker (the 1/2 mortar mark). You should now be ready to start your second course.
During this process, you will need to mix more mortar as needed. Be careful not to overwork the mixture. This can cause the bricks to stick to the mortar and create a weaker finish. If you are working in extreme heat, water should be added to the mortar to keep it hydrated and prevent it from drying out prematurely.
In addition, as you progress up the wall, be sure to leave a space between each brick. This will help with drainage and prevent rain or snow from collecting in the joints and potentially freezing and cracking the mortar. The space between each brick should be at least 10mm.
If you are not a professional bricklayer, you may find that after completing your first two or three courses, your wall is becoming quite stiff. This can be due to the clay used for the bricks not firing hot enough, long enough or consistently. If this is the case, you can add a little more sand to the mortar and try again, making sure the bricks are set evenly.
Brickwork is a beautiful material for buildings and walls, but it does need maintenance to look its best. Regular inspections, cleaning, and repairs can help to preserve the structural integrity of your brickwork for years to come.
It is essential to clean your brickwork thoroughly and frequently to remove dirt, dust, and other debris. This will keep the appearance of your brickwork and prevent any future problems. Regular cleaning and maintenance will also protect the mortar and bricks from damage caused by rain, frost, and other weather conditions.
If you have to work on a project during bad weather, you need to take extra precautions. Frost, rain, and snow can be devastating to any masonry project. Bricks that are wet or frost damaged can crumble or crack, which can reduce the strength of your masonry structure. It is best to avoid laying bricks during these conditions if possible, and to keep any partially completed brickwork covered overnight to prevent moisture in the mortar from freezing and disrupting the bond.
A hessian blanket can be used to keep the brickwork dry, but it should be weighed down with a polythene sheet to prevent it blowing away or becoming wet. The covering should be securely fastened and placed with a small gap between the brickwork to avoid ‘sweating’ and smearing of the mortar. A heat lamp may be required in extreme frosts to keep the mortar above freezing temperatures and to speed up the curing process.
The best time of year to lay bricks is during the summer or autumn when it is warm and dry. However, if you must work on a project during colder weather, it is important to check the daily forecast and take the minimum and maximum temperatures into consideration. Any mortar mix that is laid during freezing temperatures can experience a reduction in water content, lower early strength, and more cracking than that mixed at normal temperatures.
It is important to dampen the bricks before laying them, and to strike and brush the joints as they set. This helps to ensure that the joint is set properly, and can be done using a “jointer”, which is a piece of tubing that has a diameter similar to your mortar joint spacing, bent into an “S” shape. A foxtail brush can also be used to wipe away excess mortar from the face of your bricks, and to smooth out the joint.